I was recently facilitating a training session on the station rotation model when several educators expressed concern about the noise level of the classroom during a station rotation lesson. They asked how I keep the noise level down at the stations that are not teacher-led. Like most classroom expectations, I spend time directly teaching what each type of station should look and sound like.
When introducing station rotation, I have students practice physically rotating from station to station. This helps students understand how to rotate to each station and what to do when they arrive at a new station. After they practice rotating a few times, I bring the class back together and explain that to get the most out of each station, I have certain expectations for what each station looks and sounds like.
I start by explaining that because I will be facilitating the teacher-led station, I need them to stay on task and use appropriate volume when speaking. I emphasize that the teacher-led station is my opportunity to work with small groups to ensure every student in the class is getting time with me, ensuring that everyone feels supported and makes progress. Once I’ve clearly articulated the value of my teacher-led station and why I need to be able to focus on the students at that station, I’ve found it helpful to engage students in the process of identifying what learning should look and sound like given the learning task.
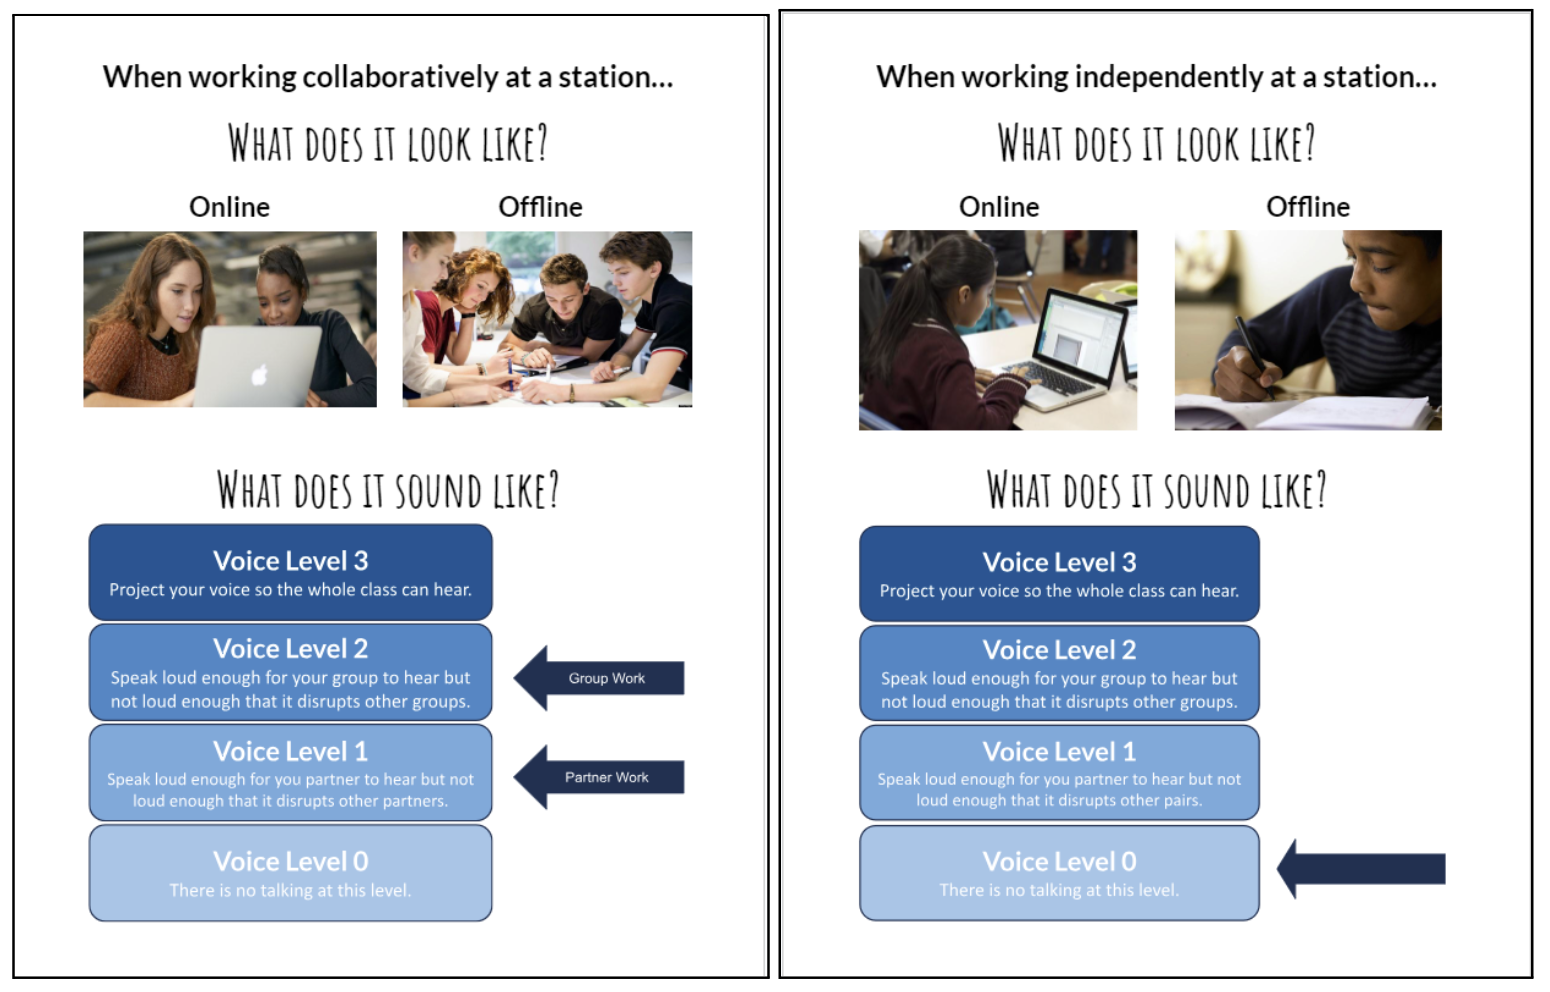
I used the following slide and had students work in pairs to discuss what they think each type of station should look and sound like and then jot down their ideas on a piece of paper. Depending on the age of the students, they can write down phrases and words, or draw simple sketches. I provide guiding questions for students who may need it, such as:

After students had a few minutes to discuss and write down what they believed each station should look like and sound like, I invited them to share their responses as I documented their ideas on the whiteboard. Once they shared their thinking, I presented my expectations. We compared their thoughts about the volume and types of interactions at each type of station to my expectations. When their responses were different from mine, we talked about why their description of the station was different from my own.
Below are some of the questions I used when facilitating this discussion about the differences between their answers and my thoughts about the stations.
Engaging students in the process of setting expectations for noise levels and interactions at a small group learning station before implementing the station rotation model has several significant benefits from increasing ownership and accountability while also creating clarity about what is expected of them. Involving students in this way can lead to a more successful and seamless implementation of the model. When students have a voice in shaping their learning environment, it is empowering and boosts their confidence in their ability to be successful. They also feel that their opinions are valued, leading to increased motivation and engagement.


Once students have a clear and explicit understanding of the expectations for each type of station, I use visual aids to reinforce these norms. Specifically, I create and display posters for each type of station, which stay up throughout the year so we can easily reference or revisit expectations. These posters serve as constant reminders, illustrating both the desired appearance and ambiance of each station.
Regardless of whether you are working with young learners or older students, being clear about what is expected creates a foundation for mutual respect and understanding. By having these expectations visually presented, students can regularly self-check their behaviors and actions, leading to a more self-regulated learning environment.
Teaching classroom expectations isn’t merely a formality; it’s an essential step in classroom management and in setting up any instructional model, including the station rotation model. By taking the time to be explicit about these expectations and using visual reminders like posters, educators set the stage for a smooth, productive, and harmonious learning experience. This approach ensures that the station rotation model is not only introduced but is also sustained effectively throughout the academic year.
If you are interested in learning how to design and facilitate learning with the station rotation model, check out Dr. Tucker’s self-paced mini-course online or grab a copy of her book The Complete Guide to Blended Learning!
The post Station Rotation Tip #5: What Does Each Station Look Like and Sound Like? appeared first on Dr. Catlin Tucker.
Blended learning seamlessly weaves together online and in-person learning experiences to boost student engagement and meet the unique needs of a diverse class by providing flexible pathways through learning experiences. Blended learning aims to lean on technology to do what it does well–information transfer–and free teachers to do what they do well–support individual and small groups of students as they progress toward firm standards-aligned goals. As teachers use blended learning models to design their lessons, they can elevate the experience for students by prioritizing three pillars of high-quality blended learning.
In this blog post, I will explore three critical pillars of high-quality design in blended learning: student agency, differentiation, and control over the pace of learning. By incorporating these elements into the design of blended lessons, educators can provide a more robust and impactful learning experience for themselves and their students.

Student agency, which offers students meaningful choices in their learning experience, is a core component of blended learning. Educators who provide options throughout a student’s educational journey nurture a sense of responsibility and ownership over the student’s education. This positively impacts their motivation to engage with tasks.
As educators, the aim should be to create opportunities for students to make critical decisions about what they learn, how they learn, and what they create to demonstrate their learning.
Content-based Choices
Giving students the agency to make decisions about what they learn or the lens they look through as they approach a particular topic or subject positively impacts their interest in learning. When students have a voice in their education, they become more engaged and invested in the process. Having the autonomy to choose topics, texts, or projects that align with their interests allows them to connect with the material on a deeper level.
For instance, in an elementary science class, a teacher designing a unit focused on ecosystems can empower students by allowing them to choose an ecosystem they are genuinely interested in exploring. Some might opt for the rainforest, while others may be captivated by the desert or ocean ecosystems. This element of choice amplifies students’ interest in their studies as they feel connected to the material they are learning about.
In a secondary English language arts class, rather than assigning a single text to the entire class, teachers can provide a curated list of books or short stories, each highlighting different themes or literary styles. Students can choose a book or story that appeals to their interests or curiosity. A student interested in social issues might select a text focusing on these themes, while another intrigued by mysteries could choose a book or story in that genre.
Process-based Decisions
Inviting students to participate in process-based decision-making enhances their competence and confidence in successfully tackling tasks. Empowering students with the autonomy to determine their approach, select materials, work online or offline, collaborate with a partner or work individually cultivates a more profound sense of ownership and investment in their learning. By acknowledging and valuing their choices, students feel more capable and responsible for their educational experience. Such personalized decision-making opportunities foster intrinsic motivation and active engagement and allow students to discover their strengths and understand their preferences, further bolstering their confidence and belief in their abilities.
In an upper elementary English or history class, students may have the opportunity to decide which discussion technique to use to discuss a short story. Teachers can spend time at the beginning of the school year onboarding the class to a few discussion strategies, like team roles, fishbowl, and graffiti team time. Once students understand and have had time to practice each, the teacher can provide a choice board of options and let students group themselves based on the discussion technique they want to use.

In a high school math class, when learning about graphing equations, teachers can invite students to decide if they would like to graph on paper or use Desmos, an online graphing tool. Those who prefer paper benefit from a tactile experience, honing their drawing skills and understanding graphing intricacies. On the other hand, Desmos users enjoy the efficiency of a digital platform, exploring graphs dynamically and visualizing equation transformations in real time. This approach acknowledges diverse learning preferences, leading to a more meaningful and effective learning experience.
The second pillar that underpins high-quality design in blended learning is consistent and effective differentiation. Differentiation involves adjusting teaching methods to address students’ unique needs and abilities, supporting their learning journeys.

For a math topic like addition and subtraction, the teacher could differentiate the learning by providing various assignments based on the students’ proficiency levels. For example, students who have mastered the basic concepts could be given more challenging real-world word problems. At the same time, those who need extra support could work on additional practice exercises with teacher support in small groups to reinforce their understanding.
In a secondary history class, teachers can differentiate the experiences of conducting research to accommodate diverse learning needs and interests. They can invite students to choose research topics related to the broader historical theme or era being studied and provide structured research guides or graphic organizers for students who might benefit from additional support in organizing information. They can also allow students to work with a research partner or in small groups. Collaborative research can foster teamwork, peer support, and the sharing of diverse perspectives and ideas.
The ultimate goal of differentiation is to leverage formative assessment data as a compass to continually identify and address students’ diverse learning needs. By proactively adapting instructional approaches, content, and learning experiences, educators aim to provide every student with a pathway that aligns with their strengths and challenges, leading them toward mastery of standards-aligned goals. Through this tailored and inclusive approach, differentiation fosters a dynamic and supportive learning environment, empowering each student to thrive and achieve their full potential.
The third pillar of high-quality blended learning centers around student control over the pace of learning. Many classroom management issues and unproductive behaviors can be traced back to a misalignment between the pace at which the learning is moving and the pace at which the learner needs it to move. If the pace of learning is moving too quickly, students may feel overwhelmed, frustrated, and decide to disengage. By contrast, students get bored and distract each other if the pace is too slow.
Blended learning strategically shifts control over the pace of learning to students, giving them the autonomy to control the speed at which they acquire and process information as well as complete tasks. Encouraging students to approach learning activities at a comfortable pace enhances their engagement and improves their chances of success.
For example, if teachers use video in class to transfer information, they should build a buffer of time around that video. That way, students can pause, rewind, or rewatch the video. Similarly, teachers using the playlist model can give students a high degree of control over how quickly they move through a sequence of learning activities to ensure all students can move at a pace that works for them.
As educators, we must strive to approach blended learning with these three key pillars at the forefront of our minds. Blended learning isn’t simply about transitioning students through a series of stations or a playlist; it’s about empowering students, personalizing and differentiating their experience, and giving students control over their learning pace.
By cultivating student agency through meaningful choices, consistently differentiating instruction and support, and providing opportunities for students to manage their learning pace, we can create dynamic blended learning environments that accommodate the diverse needs of our students. These three pillars of blended learning ensure that technology integration is not shallow but a transformative approach that enhances student engagement, instills a love for learning, and ultimately leads to improved educational outcomes.
The post 3 Pillars of High-quality Blended Learning appeared first on Dr. Catlin Tucker.
When first implementing the station rotation model, many teachers express concern about designing offline student-led collaborative stations. Although they understand the benefits of these collaborative conversations in station rotation, including increased self-efficacy, relationship building, and constructing knowledge together, teachers usually feel more comfortable designing teacher-led collaborative stations where they can control the discussion and ensure everyone is on task. However, the goal of the station rotation model, specifically and blended learning more generally, is to provide students with opportunities for agency, including selecting the questions they choose to answer and working at their own pace.
A simple strategy that I have used to help teachers design offline student-led collaborative stations is talking chips, also known as discussion chips. The process itself is simple:
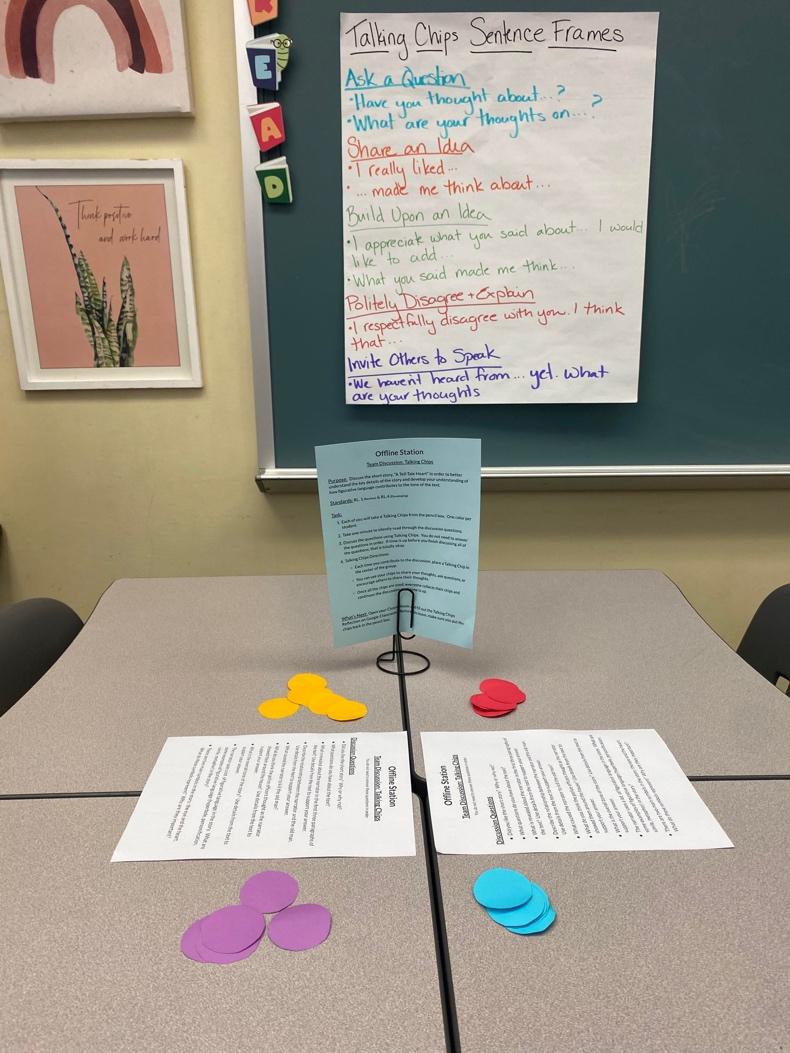
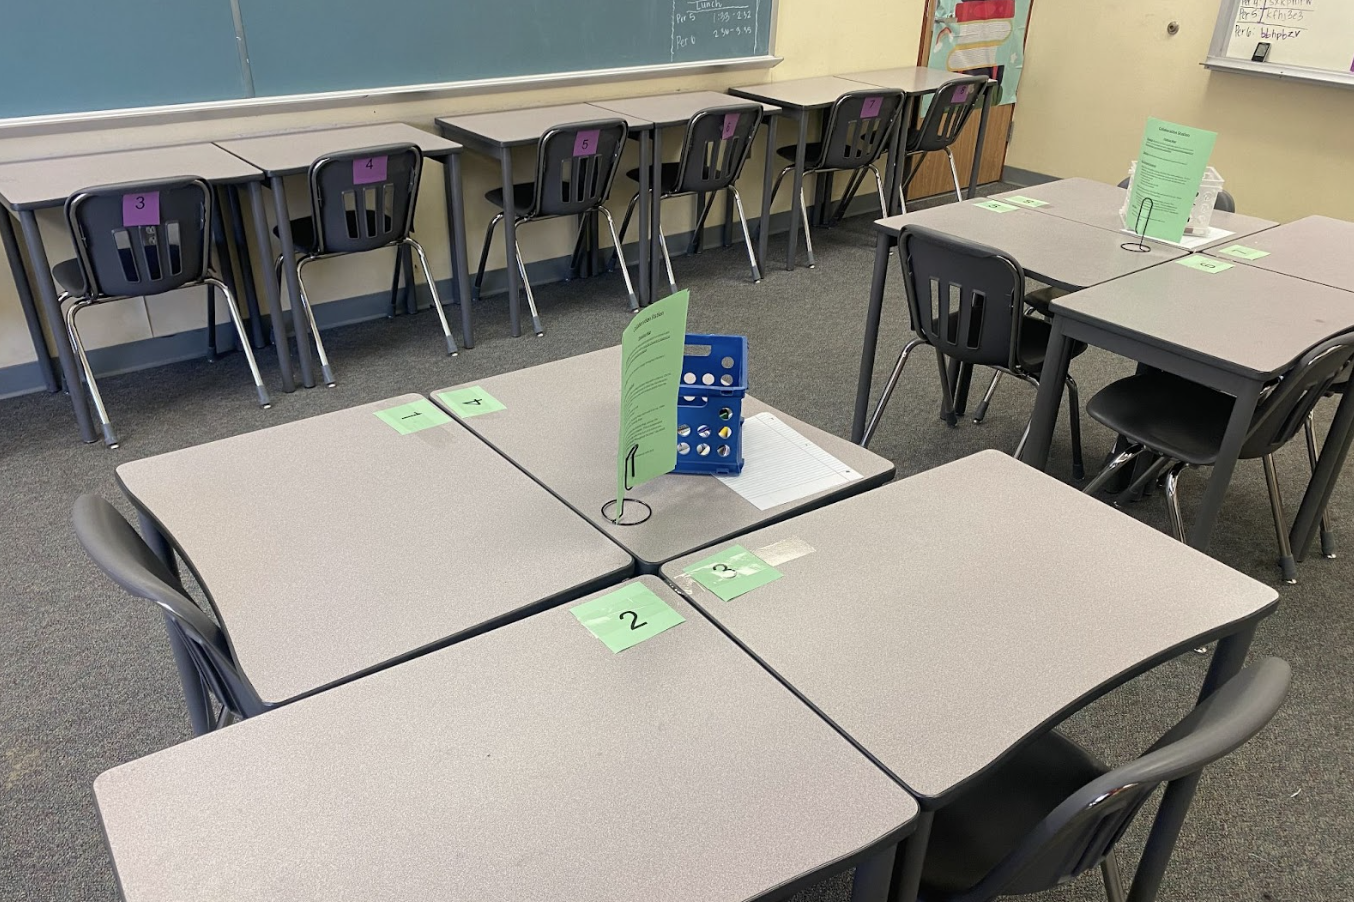
When designing these student-led offline stations, I encourage teachers to arrange the desks and chairs into groups of 4-5. That way, there are enough students to keep the conversation going but not too many students, which can make it easy for students to stay quiet and not contribute to the discussion.

At each table group, place the talking chips at the center of the table in a basket or bag. Teachers can create their talking chips using anything from plastic poker chips to laminated pieces of paper. Decide on how many chips students will use during the discussion; I personally like to provide each student with six chips, but anywhere in the range of four to eight chips works well. I also recommend that each set of chips is a different color, which allows the teacher to see at-a-glance who has been contributing to the discussion.

In addition to having clear written directions at each table, provide multiple copies of the questions that the students will be discussing. I recommend providing each group with a list of six to ten related questions. Let your students know that they do not need to answer every question, and they do not need to answer the questions in order. This is an easy way to promote student choice in the classroom and allow the conversation to feel more natural and free-flowing.
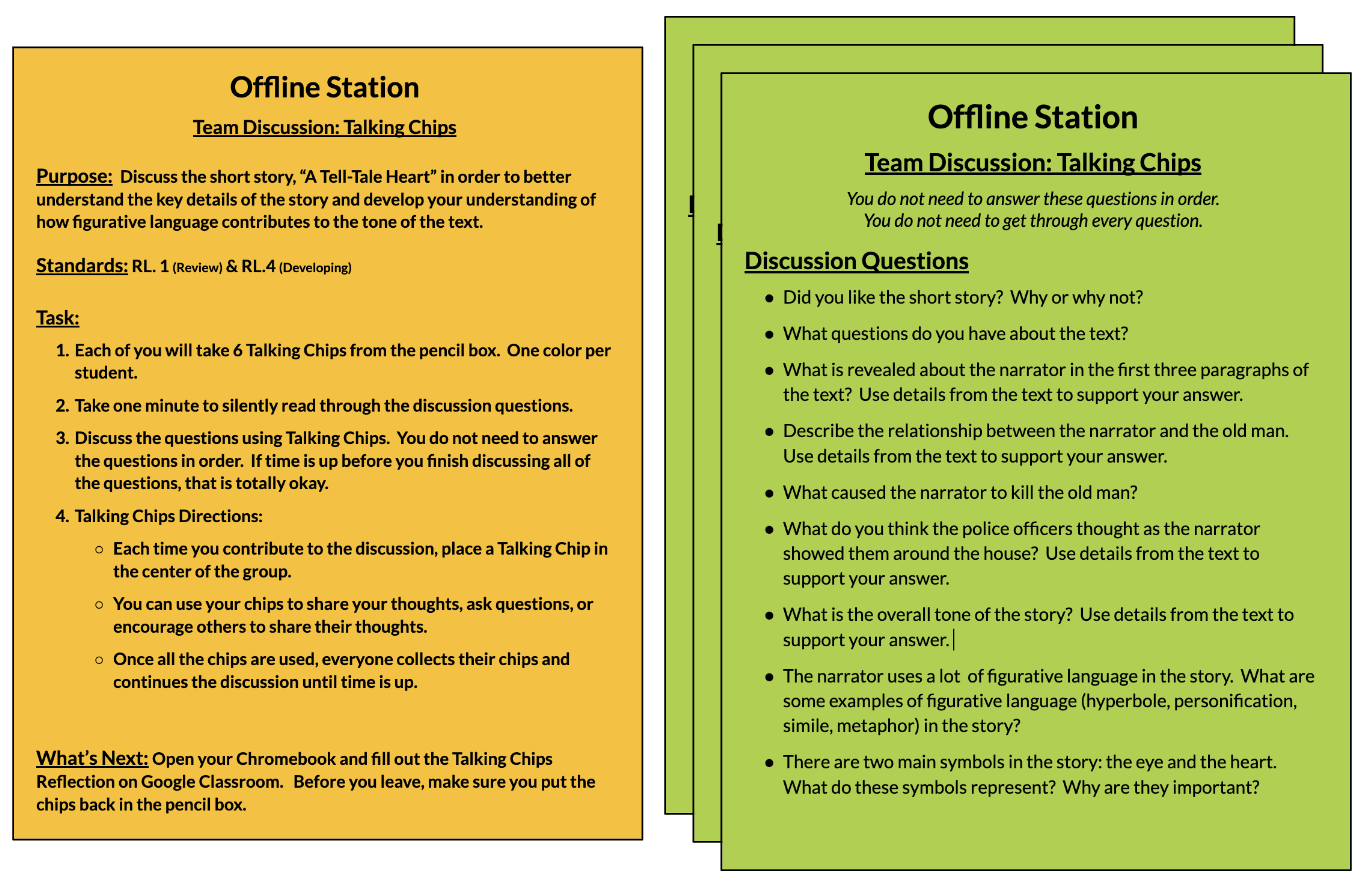
If students are referring to a text or other materials, you should have copies of those texts or materials at each table group.
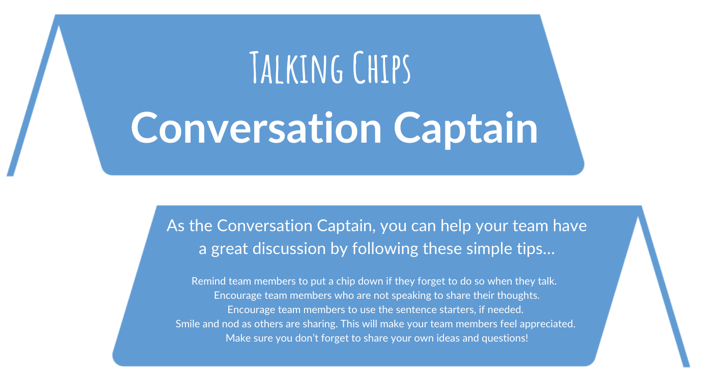
Depending on the needs or dynamics of the class, teachers may also want to assign a “conversation captain” for each group. This student encourages others to share and helps to keep the group on task. Teachers indicate who the conversation captains are by putting an asterisk next to their names on whatever document they use to project the student groups.
If needed, the teacher can also provide a tent for the conversation captain in each group. On the back side of the tent are tips to help the captains facilitate the conversation. To make a copy, click here.
To help students clearly articulate their ideas and opinions, teachers can also provide sentence frames for students to refer to as they participate in the discussion. This is a helpful strategy for English Learners and students who need extra support when formulating their thoughts.
At the end of the activity, ask students to reflect upon their collaborative discussion, assessing their personal contributions as well as the overall quality of the conversation. Teachers can facilitate this metacognitive practice by having students reflect in writing or using a Google Form like the one pictured below.
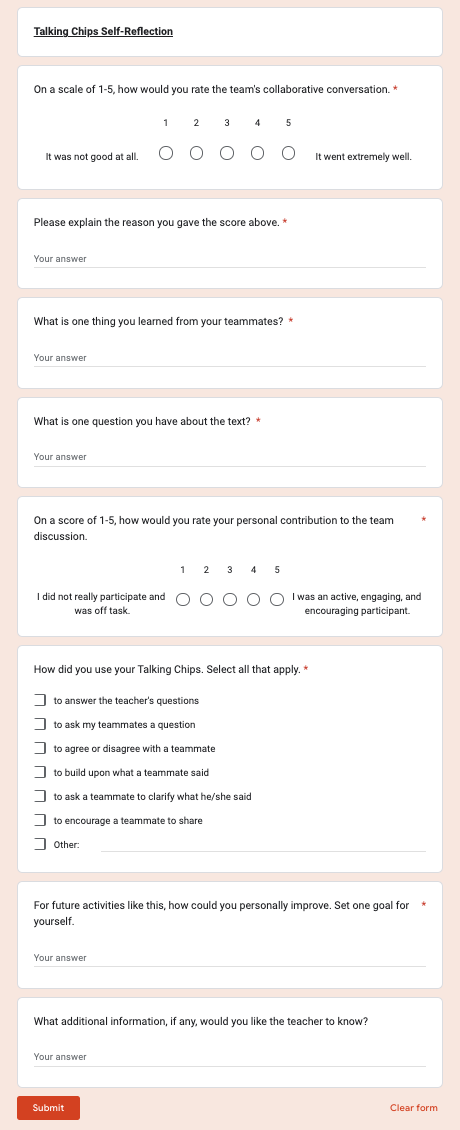
Student reflections provide teachers insight into what the group discussed as well as the overall effectiveness of and engagement during the conversations. It also provides students an opportunity to set a goal for the next time they encounter talking chips during station rotation.
In their book, The Shift to Student-Led, Dr. Catlin Tucker and Dr. Katie Novak write, “When we shift toward student-led discussions, we are supporting the development of expert learning as well as critical social-emotions learning skills, including self-awareness, empathy, perspective-taking, and responsible decision making.” Implementing the talking chips during an offline student-led collaborative station is one strategy to help students build upon these necessary 21st-century skills. More often than not, students find this strategy both engaging and fun.
The post The Station Rotation Model Tip # 4: Encourage Offline Student Collaboration Using Talking Chips appeared first on Dr. Catlin Tucker.
O Graduate Management Admission Test (GMAT) é um exame reconhecido mundialmente e uma peça fundamental no processo de admissão em programas de pós-graduação em administração de empresas. A pontuação obtida no GMAT é frequentemente um fator determinante para ingressar em algumas das melhores escolas de negócios do mundo. Neste artigo, exploraremos três casos reais de candidatos bem-sucedidos que atribuíram seu sucesso à pontuação no GMAT, destacando a importância do curso GMAT na preparação para o exame.
O post Estudos de caso de candidatos bem-sucedidos que atribuíram seu sucesso à pontuação no GMAT aparece primeiro no Mundo de Livros.

Some classes understand the expectations of the station rotation model almost immediately. The teacher explains the model, the students understand the expectations, and the class moves into stations smoothly. Other classes need a little more practice before fully implementing the station rotation model. When introducing station rotation, I encourage teachers to embrace a couple of routines to make the experience run more smoothly.
The first time I introduce station rotation, I take a few minutes to explain what station rotation is and the purpose behind it. Then, I have students practice moving from station to station.
I point to each station’s location and review the assigned seating chart. That way, students know what station to report to after each transition and where to sit during the independent and student-led collaborative stations. (Note: I don’t usually assign seats at the independent teacher-led station because that is where I will be.)
Then, I project the objective of our practice session and clearly review the expectations.
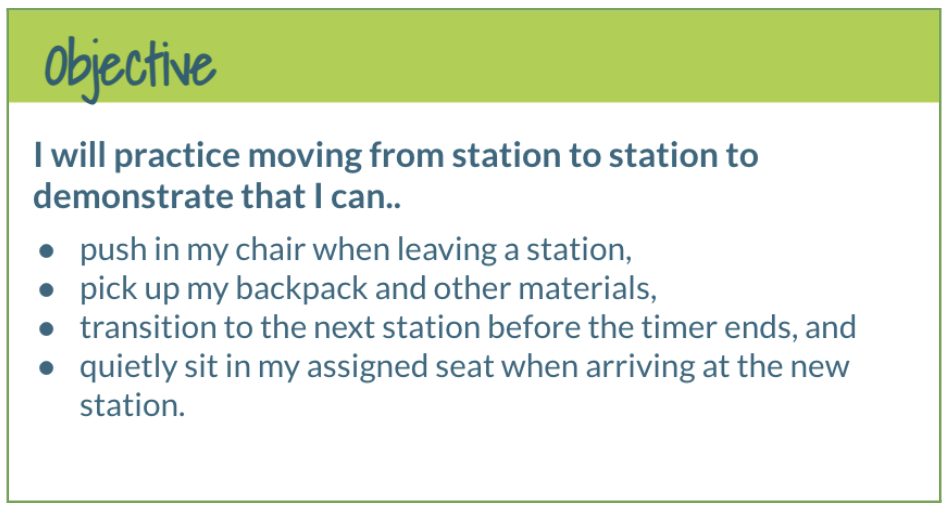
Once students understand the objective, they practice moving from station to station. Because students do not need to get out any materials when they transition, I set the transition timer to 20 seconds. Once everyone is seated in their new station, I refer to the assigned seating chart to ensure students sit in the correct seats at the student-led collaboration and independent stations.
I usually have students practice moving through the entire station rotation two or three times, depending on the needs of the students in the class. You will see improvement between each practice round.
After students have completed moving through the station rotation, I post these self-reflection questions for students to think about and discuss with a partner:
One of the challenges that teachers encounter when first implementing station rotation is that students don’t read the station directions at the independent and student-led collaborative stations. As a result, students can take a long time to get on task or bombard the teacher with questions, making it challenging for the teacher to facilitate their station.
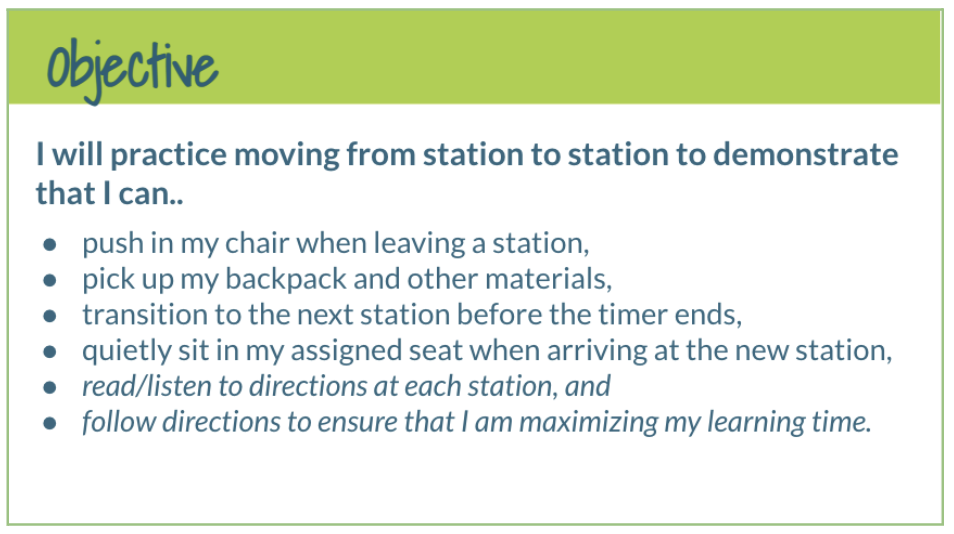
To help address this, I encourage teachers to have students practice the station rotation model again but add additional bullets to the objective, so that students know they are expected to read/listen to and follow the directions at each station.
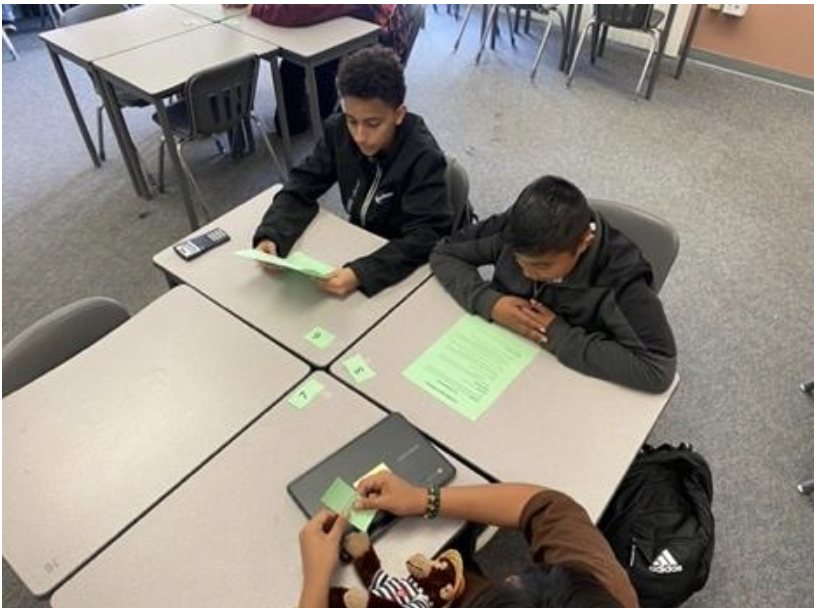
When implementing this next practice round, I set out the written directions and any necessary materials needed for each station. Then I set the transition timer and instruct students to move to their first station. Once students are seated, I set the timer for 8-10 minutes. I meet with the teacher-led small group and verbally explain my instructions to the students there. I check for understanding. Then I walk around to ensure the students at the other stations are reading and following the station directions.
Teachers working with younger students may want to use video directions instead of text-based directions. In that situation, it is still important to have students practice accessing the video directions, playing them, and practicing pausing or restarting the video. That way, even young learners can get the instructions they need.
Because this is the first time students practice reading and following directions at the independent and student-led collaborative stations, the task of each station is SEL-focused, not content focused. For example, the kids at the student-led collaborative station tables draw cards and discuss questions. What is your favorite movie? If you could travel to any location, where would you go and why?
Students at the independent station are directed to log into Google Classroom, put on headphones, and play a breathing exercise/meditation video. This breathing activity reinforces the norm that students will work quietly on their own at the independent station.
Students at the teacher-led small group station log in to their computers and fill out a Google Form. It contains questions like, What do you want your teacher knows about your learning preferences? How do you think small group instruction can help you?

After students complete the full station rotation, I again provide reflection questions. This time I have them reflect individually on a Google Form.
Having students reflect upon their station rotation practice is a great way to gauge how students feel about the model. Through student feedback, I have improved my stations to help meet individual needs.
When you first implement the station rotation model, taking a little time to have students practice it makes a big difference the rest of the year.
Stay tuned for more simple but helpful tips about station rotation! You can also check out this post on frequently asked questions about the station rotation model.
R. Noelle Gutierrez has been working in public education for almost twenty years. She spent eleven years teaching English Language Arts and History at the middle school level. She then worked as an Instructional Coach for seven years, training and coaching secondary teachers in student engagement, standard-based strategies, curriculum development, and blended learning. During her time as an Instructional Coach, Noelle developed resources for Smarter Balanced. Noelle is currently working as a middle school Assistant Principal, where she continues to coach and train teachers.
The post The Station Rotation Model Tip #3: Practice Rotating for Seamless Transitions appeared first on Dr. Catlin Tucker.
Even the most experienced teachers find themselves teaching “that one class” that needs extra support and structure when implementing the station rotation model. As a classroom teacher, instructional coach, and now site administrator, I have curated several easy-to-implement tips to help teachers effectively implement and manage the station rotation model with even the most energetic classes.
As a teacher, I always had seating charts for whole-group instruction. I looked at skill level, behavior, personality types, IEPs, and chronic absenteeism to determine the best place for my students to sit in the classroom. Seating charts help create an effective and positive learning environment and foster student collaboration. When I started implementing the station rotation model, I wanted to ensure that I could maintain that same atmosphere of engagement, focus, self-management, and respectful interactions at the student-led independent and collaborative stations.
I used various grouping strategies depending on the purpose of my station rotation, such as student skill level, interests, and strength in a group dynamic. But for those classes that needed extra structure during station rotation, I found assigning seats and strategically seating students in groups was equally important. By doing so, I could focus better on my work at the teacher-led station, and the student-led stations ran more smoothly.
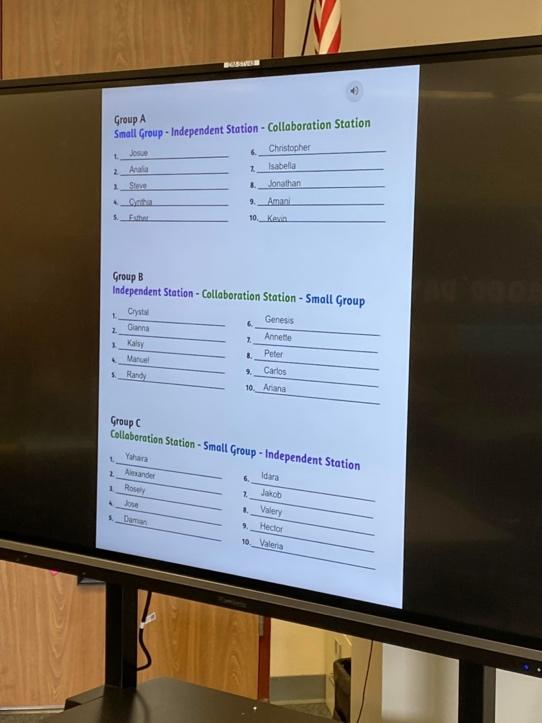
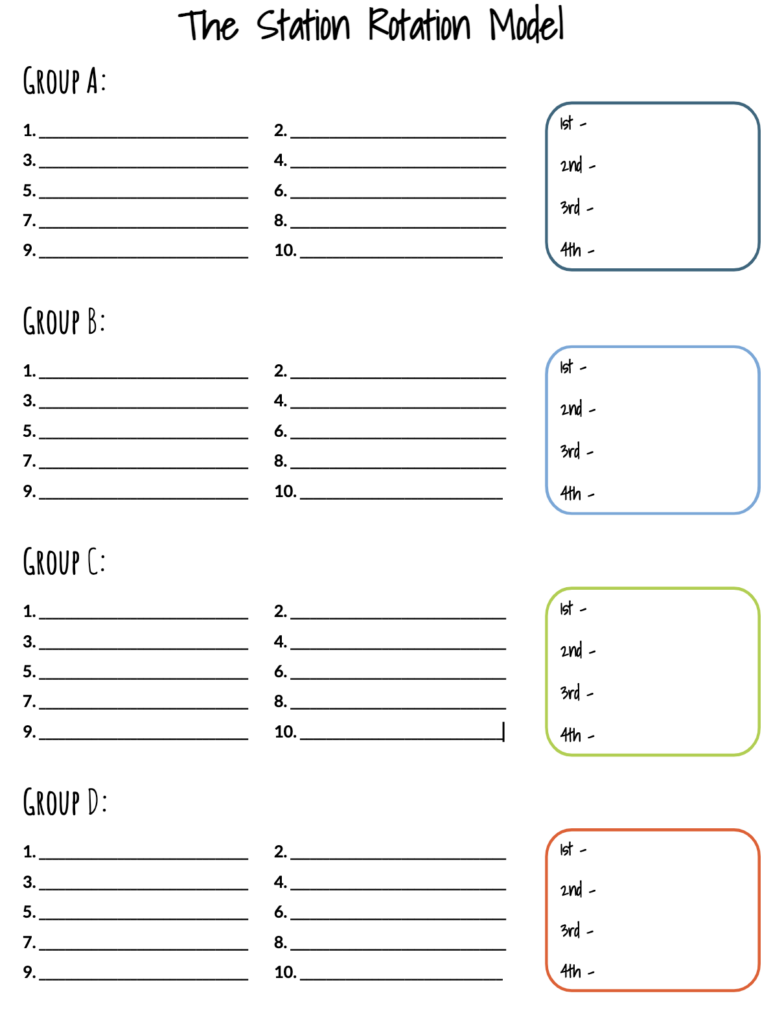
When students entered the classroom on station rotation days, they were greeted by my station rotation seating arrangement document. They looked for their names to find out which station they would begin at and what number their name was assigned to. These numbers corresponded with the seat numbers at the student-led independent and collaborative stations. I printed and laminated my seating assignment document, so I could change groups and seat assignments as needed with a black whiteboard marker.

When we transitioned to stations, students at the independent and collaborative stations sat at their assigned numbered seats. If needed, they quickly referred to the poster before they sat down to work.
These seating assignments helped maintain a productive culture during this student-led collaborative station in a variety of ways:
Seating assignments and the independent station also helped maintain a positive learning environment for many of the same reasons. I was able to separate students who shouldn’t sit together, and I was able to place specific student leaders strategically next to others that may need help during the independent station.
Teachers can print out their seating assignment chart as I did, project it from their computer, or post it in Google Classroom for students to view. Here are a couple of templates teachers can copy and use for seat assignments.

Here are a couple of other things to consider when implementing assigned seats for station rotation:
Assigned seating is nothing new in education and has many benefits. Implementing it during the station rotation model helps maintain the same productive and positive learning environment at the non-teacher-led stations.
Stay tuned for more easy-to-implement management tips!
R. Noelle Gutierrez has been working in public education for almost twenty years. She spent eleven years teaching English Language Arts and History at the middle school level. She then worked as an Instructional Coach for seven years, training and coaching secondary teachers in student engagement, standard-based strategies, curriculum development, and blended learning. During her time as an Instructional Coach, Noelle developed resources for Smarter Balanced. Noelle is currently working as a middle school Assistant Principal, where she continues to coach and train teachers.
Classrooms with clear systems, routines, expectations, and workflows run more smoothly, eliminating behaviors that can derail a class. Our work as educators is not simply to teach students content and skills related to our subject areas. It’s our responsibility to cultivate independent, self-directed learners capable of sharing the responsibility for learning with us, their teachers.
As we integrate more technology and online learning into our courses, students must develop stronger self-regulation skills and the ability to drive their learning. This is easier to do when students know what to expect in both their physical classroom and online learning environment. This is why establishing and maintaining clear classroom routines and procedures is critical. It helps students develop confidence in navigating both the space and the learning activities.
When I coach teachers who request help with classroom management, the first question I ask is, “Do you start each class with a welcome routine?” Beginning class with a consistent student-directed welcome routine is the best way to eliminate unproductive behaviors at the beginning of class and maximize our time with students.
The goal of a welcome routine is to get students to 1) enter the room and take a seat, 2) access the activity (online or offline), and 3) get started without any prompting from the teacher.
The benefits of a student-directed welcome routine include:
The activity or task can change daily, but the routine of entering the classroom and accessing the welcome task must be consistent. Some teachers use the welcome routine for retrieval practice or spiral review, others encourage students to write in response to prompts, while others use it to develop metacognitive skills, like goal setting and reflection.

Clear workflows, protocols, and procedures eliminate unnecessary chaos and confusion in a classroom. It is critical that students know where to:
It is helpful to provide video overviews of these workflows and post them in your LMS or on your class website so students and families can review the expectations for accessing and submitting work. Teachers can create short video tutorials with Screencastify or Loom to provide a clear explanation. If a student joins the class late or needs to revisit a workflow, they can watch the video.
In addition to the literal and digital workflows in a classroom, students need to know where to get supplies and how the technology and materials in a classroom should be used, treated, and sanitized.
Students need to know:
Students need to know:
Teachers using blended learning models should consider how they will transition students between learning activities. For example, if teachers are using the station rotation model, they can project a timer so students can track how much time they have for a task. When the time allocated for a specific task is over, teachers can use a simple 1-2-3 transition strategy like 1) wrap up and clean up, 2) stand behind your chair with your belongings (until everyone is ready), and 3) walk to the next station. Without clear transition strategies, movement around the room can suck up precious instructional minutes.
When setting up our classrooms, safety and accessibility should be top priorities. Some teachers have more room to work with than others. In a perfect world, teachers want to arrange their rooms to:
Once teachers have set up their space to increase physical safety and accessibility, it’s helpful to think about how we are arranging the furniture to support learning. When I coach teachers, I encourage them to set up the furniture so it reinforces the task students are doing. For example, tables grouped together suggest that students will be collaborating so conversation and interaction are encouraged. By contrast, if desks are arranged in rows, it suggests that students will be working independently.
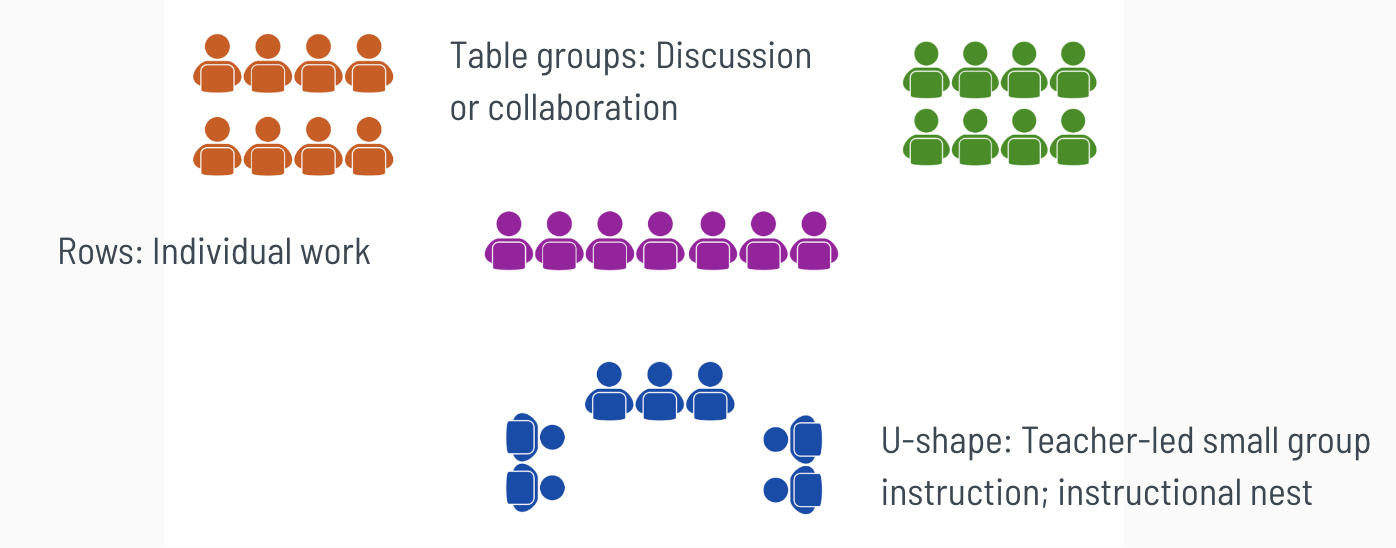
I realize teachers do not always have access to furniture that is flexible or moveable. For years, I had bulky two-seater desks that were heavy and hard to move. I positioned them in an L-formation running the length of both sides of my classroom. When students were working independently, the desks stayed in the L-formation. When they were working in groups collaborating around a shared task, they swung one side of the desk around to create one big table group. It wasn’t ideal, but teaching is one make-it-work moment after another. So, when you are planning your lessons, think about whether the furniture is set up to reinforce the task or create management issues.
As a coach working in various classrooms, it’s not uncommon for me to observe students packing up with several minutes left in class. Once they’ve put their instructional materials away, many spend the last minutes of class chatting or crowding by the door. Given how short on time teachers always feel, this pattern of student behavior doesn’t sit well with me. I want teachers and students to maximize their time together, and an exit activity can keep students working until the end of class.
An exit activity should provide closure to the lesson, collect formative assessment data teachers can use to measure how successful the lesson was at meeting learning objectives, and/or encourage a reflective practice. You can end class with a simple 3-2-1 activity that asks students to share 3 things they learned, 2 questions they have, and 1 thing that surprised them. You can tailor the actual prompts to work for your specific lesson or group of students. Alternatively, you can have students complete an exit ticket designed to gather formative assessment data or ask students to reflect on what they learned, how they learned it, and what they are still confused about.

The goal of the exit activity is to have students pause to think about their learning in an intentional way before packing up and heading off to the next class. This routine can create a higher level of awareness about the impact the work they are doing in class is having on their content knowledge and skill set, while also providing you with useful information about their progress.
It does not matter what grade level you teach–kindergarten or 12th grade–students need to practice routines and procedures. Like most things in education, the more time we invest on the front end in establishing clear systems and workflows, the more effective and efficient our classrooms will run. Not only will we have more time to dedicate to working directly with learners, but they will have the structures in place to be more confident, independent, and self-directed.
A retrospective, or “look back,” is a strategy that can be used by school leaders, professional learning communities (PLCs), and teachers to engage a group in a structured reflection and brainstorming session. A retrospective can happen any time during the school year (e.g., end of a semester or unit) to encourage a reflective practice, gather feedback, and make adjustments to improve a group’s experience.
A retrospective strives to answer four questions:
The goal of a retrospective is to encourage a group or team to reflect on their work, so they can create an action plan to build on their successes and implement changes for improvement.
If you are a school leader guiding your staff through a retrospective, a coach facilitating a retrospective for a PLC, or an individual teacher using this strategy with your students, you may want to use a digital tool, like Jamboard or Padlet. A virtual platform makes it possible for participants to share their reflections in a digital space where they can see and interact with each other’s ideas. If you are using a Padlet Wall, like the one pictured below, select the column feature to organize responses under each of the four questions. Once participants post their ideas to the virtual wall, they can heart or comment on each other’s virtual post-its.

If you prefer Jamboard, I suggest creating a slide for each question to ensure the group’s responses to each question are organized and easy to navigate.

If you prefer to make this a more tactile experience, you can segment a whiteboard into four sections or post each of the four questions in each of the four corners of a room. Then participants can capture their reflections on actual post-it notes and add them to the board or wall.
Once you’ve decided on the strategy you will use to facilitate your retrospective, you will want to follow the steps below to maximize the effectiveness of this activity.
|
Step 1 Reflect & Post |
Review the four questions with your group of teachers or students and give them time to reflect on the year and capture their thoughts on digital or physical post-it notes. Ask the members of your group to post their responses to each question. |
|
Step 2 Silent Gallery Walk |
Once everyone has posted their thoughts, give the group time to do a silent gallery walk of the responses to see what other members of the group had to say in response to each question. |
|
Step 3 Review & Cluster |
As the facilitator, you will want to identify ideas that were repeated by multiple people to identify trends in the responses and cluster similar responses together. |
|
Step 4 Discuss & Brainstorm |
Once you have reviewed the responses with the group and clustered the similar responses, group participants into smaller groups of 3-5 individuals. That way, they can engage in conversation and begin to identify the most important items from the board to create an action plan for next year. Each group should collaborate to identify: 3 things that are working well that the staff or class would like to see continue.3 things that are not working that need to be reimagined.3 struggles, questions, or wonderings they want to explore further. 3 things that are working well that the staff or class would like to see continue.3 things that are not working that need to be reimagined.3 struggles, questions, or wonderings they want to explore further. |
|
Step 5 Create an Action Plan |
Ask each group to spend time discussing and brainstorming solutions they think can help the group reimagine the three things that are not working. Encourage each group to collaborate to come up with creative solutions! |
As groups discuss the aspects of their work or their experience that did not go well, encourage them to capture their ideas on an action plan document, like the one pictured below. Ask them to brainstorm ways they think this thing could be reimaged and challenge them to identify what would be needed to make those changes (e.g., resources, a shift in mindset) and how they would measure success as this change is implemented.
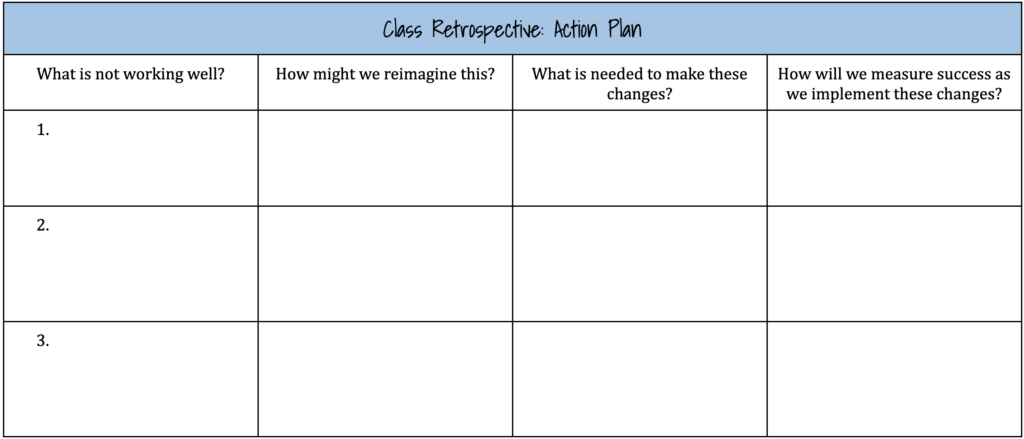
The beauty of this final step is that the school leader, coach, or teacher facilitating the retrospective can tap into the collective intelligence of the group to generate ideas for how to improve everyone’s experience moving forward. The ideas generated during the retrospective can be captured, saved, and then referenced at the end of summer as school leaders, coaches, and teachers prepare for a new school year!
Calling all coaches!

“This was an excellent learning experience for me. As a coach and as a PD leader, I took away many concrete examples that I can use with my staff.”
Who is this course for?
What can you expect from this course?